interactive flat panel

Introduction

Interactive flat panels have transformed modern conference rooms by offering a seamless, high-tech solution for presentations, team collaboration, and virtual meetings. Businesses are rapidly adopting interactive flat panels due to their superior touchscreen capabilities, digital whiteboard functions, and wireless connectivity. The integration of 4K UHD resolution, multi-touch support, and Android and Windows compatibility makes these panels a must-have for organizations looking to enhance communication and productivity.

In this guide, we will walk you through the step-by-step process of installing an interactive flat panel in your conference room, ensuring optimal performance and usability. We will also compare Vgyaan’s interactive flat panels with top competitors, showcasing why Vgyaan stands out in the industry.

Why Choose an Interactive Flat Panel for Your Conference Room?

Key Benefits of Interactive Flat Panels

An interactive flat panel is not just a display; it is a powerful tool that transforms traditional meetings into engaging, interactive experiences. Below are some of the reasons why businesses are opting for these advanced digital whiteboards over conventional projectors and screens:

·         Seamless Collaboration: Vgyaan’s 20-point multi-touch support allows multiple team members to interact simultaneously, making brainstorming sessions more dynamic.

·         Crystal-Clear Display: Enjoy superior 4K UHD resolution for sharp visuals and detailed presentations, ensuring a clear and professional display.

·         High-Speed Performance: With 8GB RAM and 128GB storage, Vgyaan’s interactive flat panels offer smooth operations and fast data access.

·         Dual OS Functionality: Vgyaan panels support both Android and Windows OPS, offering flexibility for different applications and software requirements.

·         Wireless Connectivity: Built-in WiFi, Bluetooth, and screen mirroring allow users to share screens from their devices without needing cables.

·         Multiple Size Options: Available in 55-inch, 65-inch, 75-inch, 85-inch, 98-inch, and 110-inch sizes to suit different room dimensions and business needs.


Pre-Installation Considerations for Interactive Flat Panels

Before beginning the installation of an interactive flat panel, it is crucial to assess several factors to ensure a smooth setup:

1. Selecting the Right Panel Size

The size of the panel you choose should be based on your conference room dimensions and the number of participants.

·         Small Conference Rooms (5-10 people): Ideal panel size – 55” to 65”

·         Medium Conference Rooms (10-20 people): Ideal panel size – 75” to 85”

·         Large Boardrooms (20+ people): Ideal panel size – 98” to 110”

2. Necessary Accessories for Setup

To ensure a hassle-free installation, make sure you have the following accessories:

·         Wall Mount or Mobile Stand: A secure, VESA-compatible wall mount or a mobile stand based on your preference.

·         Cabling and Connectivity: HDMI, USB, Ethernet, and power cables for a stable connection.

·         OPS Module for Windows Support: If you need Windows OS, ensure the panel has an OPS slot for a plug-in PC module.

·         Audio Enhancement: External speakers or soundbars if additional audio support is needed.

3. Electrical and Network Setup

·         Power Source: Ensure a nearby power socket with surge protection.

·         Network Connection: Use WiFi or LAN for seamless cloud connectivity.

·         Ventilation & Positioning: Keep the panel in a well-ventilated area away from heat sources to prevent overheating.


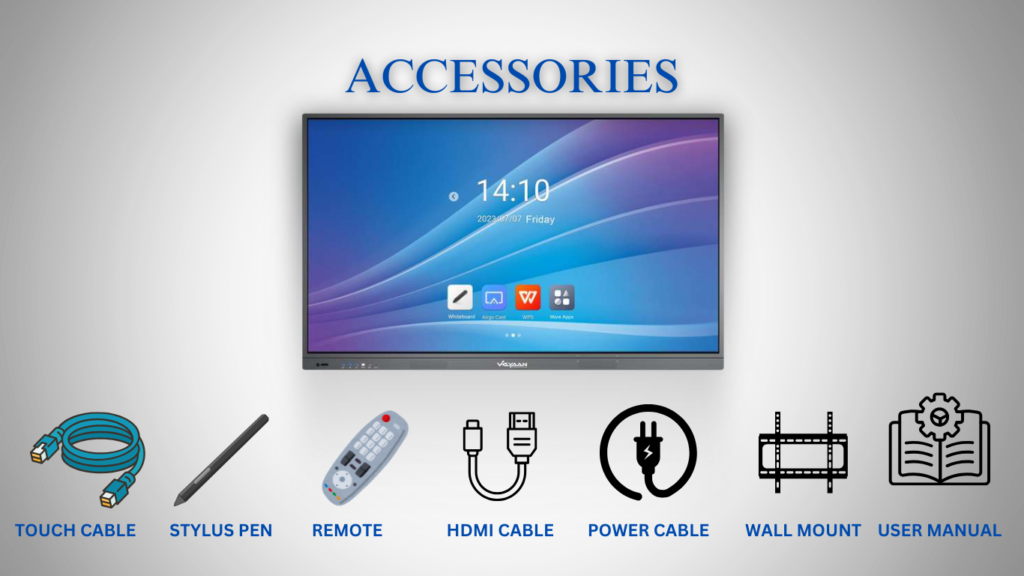
Step-by-Step Installation Guide for Interactive Flat Panels

Step 1: Unpacking and Inspecting the
Interactive Flat Panel                               

Carefully unbox the panel and verify that all necessary components are
included:

·        
Interactive flat panel display

·        
Power adapter and cords

·        
Remote control

·        
Wall mounting brackets or stand
components

·        
HDMI, USB, and Ethernet cables

·        
User manual and warranty information

Step 2: Choosing the Mounting Option

Wall Mount Installation

1.      Measure
and Mark Drill Points:
Mark the correct height on the wall for optimal
viewing.

2.      Drill
the Mounting Holes:
Use appropriate wall anchors and screws.

3.      Attach
the Mounting Brackets:
Secure the brackets firmly to the wall.

4.      Mount
the Panel:
Carefully lift and attach the panel to the wall bracket.

Mobile Stand Installation

1.      Assemble
the Stand:
Follow the manufacturer’s instructions.

2.      Secure
the Interactive Panel:
Place the panel onto the stand and fasten
securely.

3.      Lock
the Wheels:
If using a rolling stand, ensure the wheels are locked for
stability.

Step 3: Connecting Cables & Powering On

1.      Power
Cable Connection:
Plug into a reliable power source.

2.      Network
Setup:
Connect via WiFi or Ethernet.

3.      Device
Connection:
Use HDMI, USB, or VGA to connect laptops
or PCs.

4.      External
Audio Setup:
If required, connect soundbars or speakers for better
sound quality.

Step 4: Configuring the Interactive Flat Panel

1.      Turn
On the Panel:
Use the power button or remote control.

2.      Select
Input Source:
Choose between HDMI, USB, or wireless screen
mirroring
.

3.      Calibrate
Touchscreen:
Adjust touch sensitivity settings.

4.      Install
Necessary Applications:
Add essential business tools like Zoom,
Microsoft Teams, and Google Meet
.

5.      Test
Touch & Display Features:
Ensure multi-touch, writing tools, and
interactive elements function correctly.


Vgyaan Interactive Flat Panels

Feature

Vgyaan Interactive Panel


Multi-Touch Support

20 Points


Resolution

4K UHD


RAM & Storage

8GB RAM / 128GB Storage


Operating System

Android & Windows OPS


Connectivity

WiFi, Bluetooth, HDMI, USB, OPS


Available Sizes

55″, 65″, 75″, 85″, 98″, 110″


Why Choose Vgyaan’s Interactive Flat Panels?

·         Best-in-Class Touch Sensitivity (20-point multi-touch)

·         Larger Storage Capacity (8GB RAM & 128GB)

·         Dual OS (Android & Windows OPS support)

·         Available in a Variety of Sizes

·         Enhanced Connectivity Features (WiFi, Bluetooth, OPS)


Conclusion

Installing an interactive flat panel in a conference room significantly improves engagement, communication, and collaboration. Vgyaan’s interactive displays stand out with their advanced touchscreen technology, superior connectivity, and robust build quality, making them the perfect solution for businesses of all sizes.

🚀 Ready to upgrade your conference room? Explore Vgyaan’s range of interactive flat panels today!

Leave a Reply

Your email address will not be published. Required fields are marked *